Showing posts with label ideas. Show all posts

Monday, 19 August 2013

How to Upcycle Glass Bottles


I have been eyeing off this upcycle project  for some time now but have never known how to achieve a clean cut when cutting the bottle in half. I have tried the 'flaming rope' method but that left very jagged edges and the bottle was not salvagable. After doing some intense googling I found Dan Rojas, a green earth activist with amazing and easy DIY videos, and he taught me through the world wide web just how to achive a clean cut. 

The video can be seen HERE and in it Dan demostrates how to use the G2 Bottle Cutter (a seriously good investment for those interested in upcycling bottles).

Now if the above image didnt make up your mind view those below and I am sure you will be itching to try it yourself!

cheapcrafting.com
http://www.flickr.com/photos/smallstump/
unknown
homemade-modern.com
unknown

Sunday, 21 July 2013

Block Those Colours!


www.creatingreallyawesomefreethings.com

So theres a trend thats been going around for some time that I am really loving: Colour Blocking. 
This trend is super easy to achieve without going out and buying all new homewares, all you need is some paint or maybe some fabric dye.
Colour blocking is an easy way to bring a modern look to your home without having super modern decor, you want that colour to say 'POW!' so its all about how you style it! Typically colour blocking looks best against white walls however it could also look great against darker walls as the dark tones will make the colours pop even more then they would against the white. Colour blocking can also be done on your walls and looks awesome against black or white furniture.
Another interesting way to colour block is to spray paint old ornaments with bright colours and display them about your house!
I will admit this is a project I am yet to try out so stay tuned for my future projects (I'm thinking lamp shades, jewellery boxes and pot plants!). If you, like so many out there, are too busy to find the time for this then why not check out the following products from some awesome online sellers? (Most items aren't repurposed, but its always great to support hard working artisans!)


 1. Set of 3 colour blocked crochet baskets from My Very Own Eye Goggles
2. Red vintage framed magnetic black board from Shugabee Lane
3. Neon pink wooden serving bowls from Wind and Willow Home
4. Orange painted elephant from Juxtaposition SC
5. Concrete colour blocked planter from Sarai Homewares

Now scroll down for more inspiration!


http://www.stylemegreen.net
unknown
http://www.designformankind.com/
http://indulgy.com/hylleria/
http://homebecomesher.blogspot.com.au/

Tuesday, 2 July 2013

Upcycled Shelf Ideas

http://www.freeprettythingsforyou.com
Todays post is super short with a lot of pictures. I am always looking for cool ways to display my things and I am just loving these inventive upcycled shelving ideas and I am sure you will too!

unknown
http://dishfunctionaldesigns.blogspot.co.nz
lisaroyblog.blogspot.com
http://www.casasugar.com
http://www.psbydila.com

Wednesday, 26 June 2013

DIY Decoupage Tray

Todays DIY is a super easy one, all you need is a blank tray (mine I have previously spray painted white), various coloured tissue paper and a decoupage finish (I used Royal Coat). For my tray I decided to attempt an 'ombre' effect with pink/orange but you could do practically anything.


Step 1: Ensure surface is clean and dust free

Step 2: Using a flat brush, spread small amount of decoupage finish on suface of tray

Step 3: Cut circles of tissue paper and press firmly down to ensure they have stuck, with no air bubbles

Step 4: Paint layer of decoupage finish on top of paper

Step 5: Repeat until finished.

'Ombre' effect
My tray is now in its new home on my studio desk, holding all my jars willed with paint brushes and pens. Where will yours live? This project took me only an hour so if youre looking for something quick and effective to do, then this is it! (Time excludes painting the tray)

Saturday, 22 June 2013

ELCdesigns

Today I am posting a little feature on my art/design business ELCdesigns.
My main objective is to create beautiful homewares and fashion pieces by using pre loved items to be as earth friendly as possible. My best sellers are dishes in the 'Triangle Holiday' range, they are teak platters in different shapes circa 1970 that I have painted to give a new lease on life and bring a pop of colour to any room. I also sell jewellery made from beads I find in thrift stores and hand made polymer clay beads and I am currently working on a range of tote bags and cushions usig my signature pineapple fabric and pre-loved bed linen.


Thursday, 13 June 2013

Today We Are Loving:


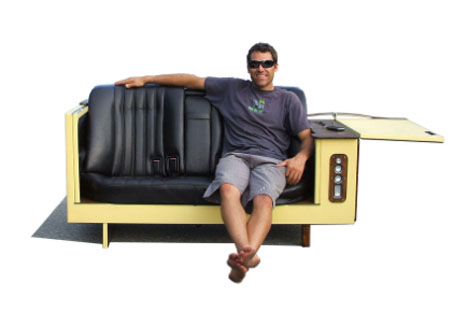
Today we are loving these awesome sofas by designer Adrian Johnson. Two guesses what they are made from?! 
Well the first answer is obviously car seats but what is the second? Do you give up? FRIDGES! 
These totally quirky sofas known as the 'Fridge Couch' are the meaning of upcycling! Priced from $5000-$7000, every couch is unique. See more here.


Wednesday, 12 June 2013

Chair-tastic


Todays post is full of fabulous ideas about what to do with a thrifted chair. If a chair took your fancy in your local thrift store, or you found one calling out to be saved in the local hard-rubbish you're probably wondering how you can jazz it up a little. I am a bit of a chair collector and have spent many hours  trying to decide which move to take in updating my chairs. Today I am sharing my research with you in the hopes that I can make something wonderful happen. 
Giving a chair a new look can be as simple as giving it a new coat of paint, 'dipping' it in the paint (a current trend) or trying your hand at some simple re-upholstering. If you feel like a challenge then there are many options for you; distressing your chair, decoupaging your chair with fabric or your choice of paper (comics, maps, wrapping paper, etc), removing the legs and making it into an out door swing, putting two or more chairs together to create a bench (by removing existing seats and replacing with longer wood/metal to stetch accross all seats), hand painting delicate patterns or even yarn bombing your chair!
Truely, the possibilities for this project are endless so let your creativity run wild and show me your finished project!

http://www.mrkate.com
http://diyremodelingpins.com
http://100percentdelicate.blogspot.com.au

http://www.kokokids.co.uk/
http://www.ravelry.com
Unknown